Simplify user onboarding with “preferred placement”
Overview
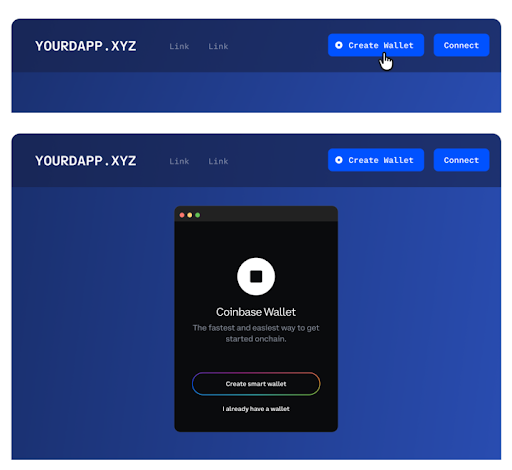
For the best onboarding experience, we recommend adding a highly visible ‘Create’ or ‘Create Wallet’ button to your dapp’s homepage (referred to as “preferred placement” - see example images below).

For new users, navigating through “Connect” in order to get started is unintuitive, and requires them to understand that they do not need a Coinbase Wallet yet to create one.
This difficulty can be prevented by streamlining the onboarding experience and adding 'preferred placement' aka 'create wallet' button to a page. This simplifies the choices for a new user and gets them ready to use your dapp in a few seconds. Plus, we're offering additional incentives to dapps who implement this new approach.
We recommend two paths for implementation:
- Match our branded Create Wallet button
- Match your own apps look and feel in the Create button
Example:


Implementation
With wagmi
To implement the Create Wallet button with wagmi, all you need to do to trigger the create is call connect.
import React, { useCallback } from "react";
import { useConnect } from "wagmi";
import { CoinbaseWalletLogo } from "./CoinbaseWalletLogo";

const buttonStyles = {
  background: "transparent",
  border: "1px solid transparent",
  display: "flex",
  alignItems: "center",
  fontFamily: "Arial, sans-serif",
  fontWeight: "bold",
  fontSize: 18,
  backgroundColor: "#0052FF",
  padding: "7px 14px",
  borderRadius: 10,
};

export function WagmiCreateWalletButton() {
  const { connectors, connect, data } = useConnect();

  const createWallet = useCallback(() => {
    const coinbaseWalletConnector = connectors.find(
      (connector) => connector.id === "coinbaseWalletSDK"
    );
    if (coinbaseWalletConnector) {
      connect({ connector: coinbaseWalletConnector });
    }
  }, [connectors, connect]);
  return (
    <button style={buttonStyles} onClick={createWallet}>
      <CoinbaseWalletLogo />
      Create Wallet
    </button>
  );
}
Notes
- For more detail, view the
useConnectdocumentation. - Upon successful connection, account information can be accessed via data
returned from
useConnect, or viauseAccount.
With CoinbaseWalletSDK only
To implement the Create Wallet button using only the SDK, all you need to do is send an eth_requestAccounts request.
import React, { useCallback } from "react";
import { CoinbaseWalletSDK } from "@coinbase/wallet-sdk";
import { CoinbaseWalletLogo } from "./CoinbaseWalletLogo";

const buttonStyles = {
  background: "transparent",
  border: "1px solid transparent",
  display: "flex",
  alignItems: "center",
  fontFamily: "Arial, sans-serif",
  fontWeight: "bold",
  fontSize: 18,
  backgroundColor: "#0052FF",
  padding: "7px 14px",
  borderRadius: 10,
};

const sdk = new CoinbaseWalletSDK({
  appName: "My Dapp",
  appLogoUrl: "https://example.com/logo.png",
  appChainIds: [84532],
});

const provider = sdk.makeWeb3Provider();

export function CreateWalletButton({ handleSuccess, handleError }) {
  const createWallet = useCallback(async () => {
    try {
      const [address] = await provider.request({
        method: "eth_requestAccounts",
      });
      handleSuccess(address);
    } catch (error) {
      handleError(error);
    }
  }, [handleSuccess, handleError]);

  return (
    <button style={buttonStyles} onClick={createWallet}>
      <CoinbaseWalletLogo />
      Create Wallet
    </button>
  );
}
Benefits for you:
By integrating a create wallet button on the front page of your app, you are eligible for:
- Increased volume of gas credits via our Cloud paymaster
- Comarketing and promotional opportunities with Coinbase
- Featured placement in our dapp listings on homebase.coinbase.com
For more information, please fill out the form on coinbase.com/smart-wallet so our team can get in touch with you.